1919 A4 Forums banner
161 - 180 of 192 Posts
This is British WWII for 3-Inch and 4.2-Inch mortars but think it will help with what you're trying to identify. Originally they used a "Firing Pin" with a pointy tip to pop the primer when the round dropped down the barrel. This was changed to a "Firing Stud" which is flat on the end. The launching cartridges each had an adapter that had its own firing pin built into it which is shown in the drawing and in the B&W photo showing cartridges with the clips installed.

My understanding for the change was related to the time and effort required to change a broken firing pin in combat with a hot tube during a fire mission. If each cartridge had its own firing pin, you simply dumped the round if there was a malfunction of any type and moved on to the next round.
I appreciate the insight! I noticed your B&W diagram of the shell shows felt wads being used with shot cards to fill the extra space in the round not taken up by powder. Saw someone else mention doing this before to get complete powder burns. Are you also using this method? Or are you cutting down the hulls to a shorter size and then crimping?
 
I appreciate the insight! I noticed your B&W diagram of the shell shows felt wads being used with shot cards to fill the extra space in the round not taken up by powder. Saw someone else mention doing this before to get complete powder burns. Are you also using this method? Or are you cutting down the hulls to a shorter size and then crimping?
My black powder loads have felt or wool wads over the powder and then a thin card disc at the end since I'm roll crimping them. Usually they are filled all the way between the components so I've never cut the hulls down when using black powder. Having now tried Bullseye with great success, I'll probably use less powder, at least in the 28-gauge rounds for the 2-Inch mortar rounds. Probably will use multiple wads though instead of cutting them down since they are cheap it would be easier than cutting the hulls straight without some sort of trimmer.

Never had a launching cartridge back out on firing from any of the 2, 3 or 4.2-inch mortars I play with. But I'd imagine the inside tube on the tail unit isn't as pristine as a new-made and oiled round. Would certainly be a ***** to break down the 4.2 so a full sized bomb could be dumped out. Barrel alone is 90 pounds so add on the base cup with ball which is comparable to a truck's receiver hitch and ball, plus the weight of a bomb.

For the clip-on devices which use a firing stud, I'm not sure where you would find them today but they may be out there surplus somewhere for a 12-gauge size cartridge.
 
A little more progress tonight. Found some 4130 tubing that will fit a 20ga shell nicely. Took a small amount of fitting with a drum sander on a dremel, only where the brass is on the 20ga shell. The 4130 is a little more expensive than the DOM I was using before, but it'll balance out when you don't need the 3/8NPT plug.

Right now I'm trying to decide if I want to do a long tail as in the earlier pics I posted, or try a short tail with the vent holes between the fins. My only worry about the short tail is the effects of the gases on the fins, where the long tail would be more forgiving.

Of I had my form 1 approved right now if just go out back and test them... maybe soon.
View attachment 146706
For those of us starting on this project at home, do you mind sharing what inner diameter you ended up using? I was considering some with a ID of 0.6870
 
Not to derail this thread, but if anyone else is shocked by the price of actual 60mm surplus cleaning kits being sold ($150+), I found some 60mm copper brushes on Amazon for much cheaper (2 for $20). Mine arrived today and they are a perfect snug fit for my Vega tube. I plan to epoxy the brush into the end of a dowel or cut down broom handle.

Utoolmart Copper Wire Tube Cleaning Brush, Round Chimney Cleaning Brush, M12 Threaded Interface Cleaning Brush, 60mm Diameter 160mm Length, 2pcs

^Not a link- wasn't sure if those allowed. But that is the product name so it should be easy to find if anyone else is interested.
 
Discussion starter · #167 ·
Thank you for all the info! What about the 81mm rounds? Are they using different diameter threads in the body, tubing, and 12 gauge blank? Do you mind please sharing those specs if they are different?
Yes, the 81mm rounds use 1" OD tubing, 3/4" allthread and nuts, and 12ga blanks. I have been stalled on this project for a few weeks due to other projects. But I'll be shooting the 60mm rounds a bunch this weekend and then maybe will have time to develop this further
 
I am new to this forum and am currently looking into building my first mortar, but the idea of ammo that can be primarily 3D printed has me super excited, especially given that I have been looking for something like what you seem to have created for som time now with little to no luck. Is there any chance at all that you would be willing to share the stl’s for your designs? I would gladly compensate you for the files if that would help motivate you to share them. I have no interest in sharing them with anyone else, they would be for my personal collection only. I would have messaged you directly, but as I said I am new to this platform, actually in truth, I joined just in hopes to speak with you, but I am not seeing any option for a private message. If there is one that I am missing, please message me, or reply to this comment. I am beyond impressed with what you have accomplished here!
 
Discussion starter · #169 ·
@AmericanMuscleWS6

Send me an email and I can try to answer some questions. Jacob.chevtec@gmail.com

I just got back from a big event where I shot a bunch of my 60mm rounds. Broke most of them but they are all easy repairs. Most just need new printed fin sections put on the stems and new nose fuzes as the chalk ones are expendable. We were able to walk the rounds in on a truck about 150yds down range with 25grain bullseye launch charges. Also walked some m69 rounds in using 30gr charges in bonetti ordnance motors.

I'll respond when I can. But can also answer questions here. I think I am going to beef up the fins just slightly and make them less tight on the fin stem, as I think pressing them on could be causing stress fractures that develop into full cracks.

Here are some aftermath pictures. I'll post some firing pics and videos later. @joshs1ofakindxj and I did a fun mortar demonstration and let dozens of people experience firing them off.
 

Attachments

I know I am late to this party but what are the ramifications in using say M769 60mm prac round in those older style of mortars? Just needs to be modified? Too long? Reason I am asking is a have a bunch.
 
Discussion starter · #174 ·
I know I am late to this party but what are the ramifications in using say M769 60mm prac round in those older style of mortars? Just needs to be modified? Too long? Reason I am asking is a have a bunch.
From my research, it seems to not be an issue unless you go above "charge 1." There were intermediary rounds that have a charge 1 or charge 2 limit for m2 and m19 mortars. Likely due to the older mortars being made of inferior metals and the much higher performance(pressure) of the newer rounds.

And you aren't late to the party. I just haven't gotten very far with them in the last 2 months since I've had a lot of MG work and been busy with the kids. I actually just got my first m769 on trade the other day and it's pretty cool. I wouldn't mind having a bunch to use, but they sure are long. And mine has a broken fin, which is a lot harder to fix than my 3d printed versions haha
 
That makes sense, in order to get almost double the distance you would need an increase working pressure. Also the tubes on M224 mortars are considerably longer then the M2 to run the longer rounds with that pressure.

As said before I do have a considerable amount of some 60mm and 81mm so if you do need any let me know. I also can get extra fins for then. Was going to start posting some on the market but just joined yesterday and am remodeling my house. So I have been busy aswell.
 
Discussion starter · #178 · (Edited)
Time for a little update.

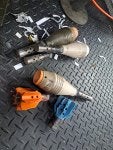
One of the guys testing my 60mm rounds out west has had a couple interesting ideas. I've been working on a point detonating spotter tip for a bit and have one that works, but he went a much simpler route. He took a 3d printed 40mm projectile that launcherpope.com created and grafted it on my chalk cone tip. He said he had a 100% success rate out in the desert. So I did the same thing and will test it out here in the muddy east. The design is very simple and is made to be legally compliant when using black powder. Just fill the chamber with BP, plug with 209 primer, glue nosecone on, and then you put an m3 screw in the tip when ready to fire. Screw it all the way in and then back off 1/2 turn for spacing.

Image
Image


Another thing he does different, is to leave the fin stem long, like an m769, and drill the vent holes above the fins. That way placement isn't as critical. While this is cool, and easier to make, and may extend the fin life, it also costs more $$$ per round as the tubing is the most expensive part. I also wonder about the consistency of the powder burn. As having more room in the expansion chamber would mean you'd have to assemble your blanks much more consistently to keep the powder from just spreading through the tube. But it's an option for those that wish to make them that way. I haven't asked him how he is loading the blanks.

I also have a machine shop doing the drilling of the holes for the stems. Much better than my hand drilling. He is doing an initial run of 30 that i will then weld up and finish. I also modified my fins a bit to add strength where I've had them crack. I've also opened up the holes so that they see less blast from the metal vent holes and alignment isn't as critical. I also made them a little looser on the stem so that they are easier to assemble, but do require good epoxy. I also scuff up the stems and groove them with a file to give the epoxy a good bite on them. Hopefully they work out well. I think some of the fin failures were just from hammering them onto the stems and hammering the old blanks out.
Image

Image
 
161 - 180 of 192 Posts